
Veyrfall: a tactics guide to the Broken Dominion
Updated 16 October 2026
Veyrfall is turn-based and unhurried, and its fights are usually decided a few moves before they end. This guide explains the numbers underneath: why high ground matters so much, how the Veyr wheel decides which hits land hard, and how to turn the ground itself into an advantage.
How a turn works
There are no rounds in which everyone moves at once. The Momentum ribbon at the top shows who acts next: faster units bank momentum more quickly, so they act more often. When a unit's turn comes, it has two action points. Spend them to move and strike, to strike twice, or on Guard, which spends everything on defence and holds the bonus until that unit's next turn. Wardens guard harder than anyone.
Units climb at most one level of height in a step and drop at most two, and forest and ruins cost two movement each, so the shape of the map decides who can reach whom.
Ground decides fights
The tile under the defender gives cover. The tile under the attacker changes the attack.
- Ruins: the best cover, +3 defence to whoever stands in them.
- Forest: +2 defence, but attacks made from inside a forest lose 10% accuracy.
- High ground: +1 defence, and attacks made from it gain 10% damage and 10% accuracy.
- Height stacks on top: every level you stand above your target adds another 10% damage and 5% accuracy, and every level you attack up costs you 5% accuracy.
- Corrupted Veyr: attacks made from it hit 15% harder but are slightly less accurate.
- Water cannot be crossed.
The lesson is old and still true: take the high ground and make the enemy climb to you. A ranger two levels above its target hits 20% harder and more reliably than the same ranger standing level with it, and the target firing back up at it is the one losing accuracy.
The Veyr wheel
Every unit and ability carries one of seven threads of Veyr. Six of them form a wheel, each strong against the next: Pyra (fire) beats Vitae (growth), which beats Gravitas (weight), which beats Chrona (time), which beats Umbra (shadow), which beats Luxa (the old dawn), which beats Pyra. The seventh, Nexus, is neutral to all of them.
- A strike the wheel favours is Resonant: 25% more damage.
- A strike it opposes is Damped: 20% less.
- Hitting a unit of your own thread is also weaker, by 15%.
- Casting an ability of your own thread lands Attuned, 10% harder.
Line your attackers up against the threads they beat, and keep a unit away from the thread that beats it.
Charged ground and rift surges
Some ground is charged with a thread. Standing on ground of your own thread heals you 2 health a turn and empowers your casts by 15%; standing on opposed ground gnaws at you instead. Long battles also bring rift surges: from the fifth turn, and every eight turns after, four tiles erupt for three turns, healing matching units 4 a turn and empowering them by 25%. They are worth fighting over, and worth denying to the enemy.
The Ashen Company
- Kael Dravos, Captain of the Ashen Company: a Bladeguard of Pyra.
- Sera Venn, an Enclave deserter: an Arcanist of Chrona.
- Bren Callow, a Verge pathfinder: a Ranger of Vitae.
- Nyxa Thorn, Knife of the Veiled Roads: a Shadewalker of Umbra.
The six disciplines
Bladeguards hold the line, Wardens anchor it, Rangers reach past it, Arcanists break it, Luminaries mend it, and Shadewalkers ignore it entirely.
- Bladeguard (swords, heavy armour): Cleaving Arc and Iron Resolve.
- Warden (spears, heavy armour): Bulwark Stance and Shield Slam, and the strongest Guard.
- Ranger (bows): Piercing Shot and Marked Quarry.
- Arcanist (staves): Veyr Bolt and Resonance Field.
- Luminary (staves): Mending Light and Radiant Ward, the Company's healing.
- Shadewalker (daggers): Rift Step, Exposing Strike and Pilfer.
At level 5 a Company member can take a secondary discipline from their character sheet, and its abilities and passives stack with their own. Two promoted disciplines are earned through the campaign: the Dawnkeeper, a Luminary who carried the light somewhere it should not have survived, and the Riftblade, a Bladeguard who treats the rift itself as an edge.
Know the enemy
- Riftspawn Husks charge. Meet them on ground you chose.
- Dominion Watchmen hold their ground. Come to them from above, or leave them.
- Null Stalkers hunt your casters. Keep your Arcanist and Luminary behind someone.
- Veiled Binders lash out from range. Close the distance quickly.
- Ashen Renegades are commanders, and commanders focus your wounded. Pull a hurt unit back before it becomes the target.
Gold, gear and learning abilities
Fallen enemies pay gold and missions pay more. Equipment only changes hands at the Camp, around the fire, so spend before each deployment. Every action earns skill points, and gear with a latent art teaches its wearer as they fight: master it and the ability stays with them for good, even after the gear comes off. Some pieces only teach certain disciplines, and a Latent Art bar under an equipped piece at the Camp means it is still teaching.
Nyxa's Pilfer steals what an enemy carries, once per mark: soldiers carry gear, riftspawn carry supplies, and commanders carry better. Bosses carry exceptional equipment that cannot be bought anywhere, only taken from them while they still stand.
The campaign
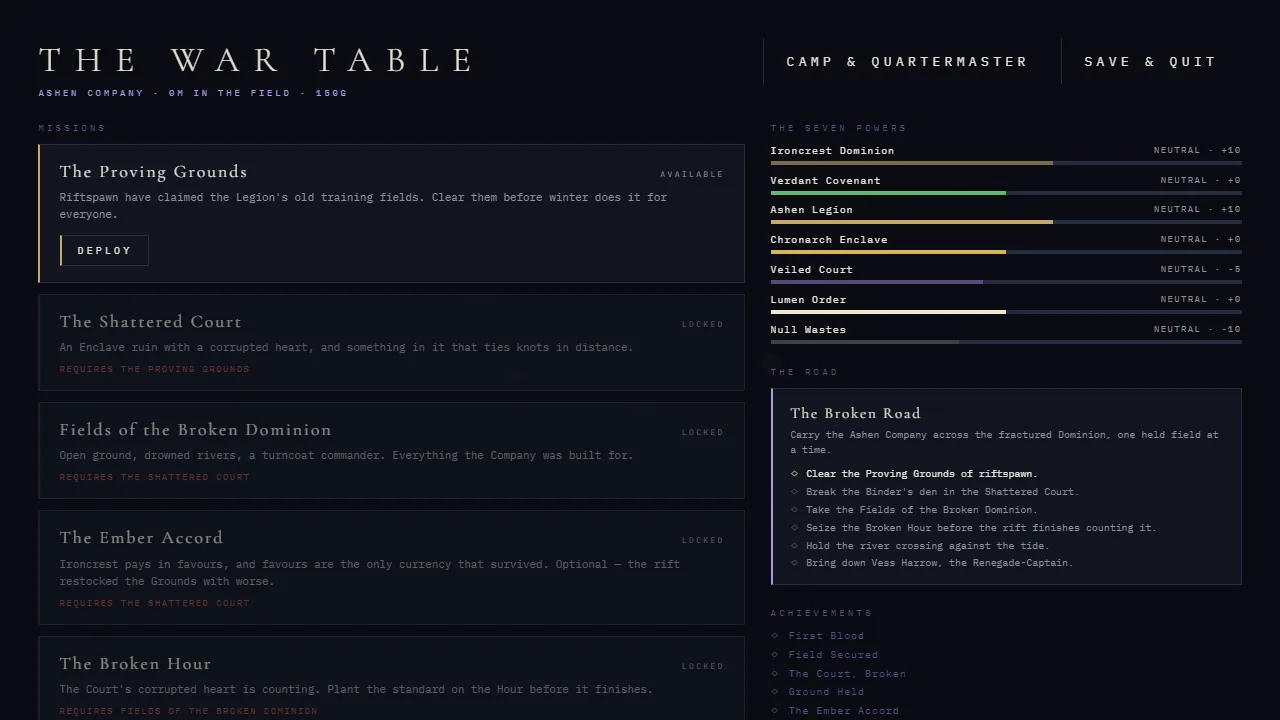
Missions open from the war table, and your choices there move your standing with the seven powers of the broken world: the Ironcrest Dominion, the Verdant Covenant, the Ashen Legion, the Chronarch Enclave, the Veiled Court, the Lumen Order and the Null Wastes. Some missions only open to friends of the right powers.
- The Proving Grounds: the Company's training field, a small 8 by 8 map.
- The Shattered Court: a 12 by 12 battle, and the Binder's den.
- Fields of the Broken Dominion: the large 20 by 20 battlefield.
- The Ember Accord (optional): opens after the Shattered Court to those in good standing with the Ironcrest Dominion.
- The Broken Hour: unlocks the Dawnkeeper.
- Hold the Crossing.
- The Renegade-Captain: the Company's own drills turned against it. Opens once the Broken Hour and the Crossing are won, and unlocks the Riftblade.
Save and Quit in the middle of a battle keeps everything, down to positions, wounds, active surges and whose turn it was, so a long fight can be finished another day.
Controls
Click or tap a tile to inspect and select it; move the tile cursor with WASD or the arrows, confirm with Enter or Space, and cancel with Esc. Drag with the left mouse button to pan, drag with the right to rotate, and use the wheel to zoom; Q and E rotate the view by 90 degrees, + and - zoom, and C recentres. On a touchscreen, drag to pan, pinch to zoom and use the on-screen rotate buttons. A gamepad works too.
Ready to play?
Veyrfall runs in your browser, free, with nothing to install. Play Veyrfall now, or browse the categories for something else.
More guides
- Playing online with friends
- Keepsies: a guide to mibs, marbles and the eight Rings
- Little Bubbling: a guide to brewing, selling and staying out of the cells
- Syphon's Slap Arena: how to slap harder, defend and win the Slap League
- Chaos Island: how to survive every disaster
- Camp Kindling: a guide to your first nights
- Tall Tails: a fishing guide
- Contrail Cup: planes, stages and racing tips
- Pulsar League: a beginner's guide to rocket football
- Packfall: playing with your dog, and staying alive
- Acheron: a guide to your first escape
- Secret of Rapture: a spoiler-light guide
- Greenside: a golf guide to all nine holes
- Road Riot: a guide to fighting, racing and staying out of handcuffs
- Blackjack basic strategy: when to hit, stand, double or split
- How to play Texas Hold'em: hands, odds and position
Spotted something out of date? Games here are updated often, so tell us through the contact page and we will fix the guide.